
Picture this: you’ve spent months working on a new product launch, updating your online store, and crafting the perfect description. But when customers land on your product page, they bounce within seconds. And your product ads are getting impressions, but no clickthroughs.
What’s going wrong? Chances are, your product photos are letting you down.
You can't sleep on product creative. Every ecommerce business worth their salt knows that beautiful product photography can be crucial in transforming curious website visitors into determined buyers.
This guide will walk you through everything you need to know about creating stunning product imagery that ultimately drives sales. And, if done well, it won't cost you a fortune either.
From setting up your first DIY photoshoot to understanding when it’s worth investing in professional product photography services, we’ll cover the techniques, tools, and strategies that successful brands use to showcase their products. Ready to transform your product photos from amateur to amazing? Let’s get going.
What is ecommerce product photography?
Ecommerce product photography is the art of creating high-quality images specifically designed to showcase products for online sales. These images form the foundation of your online presence, appearing across your website, social media platforms, advertising campaigns, and marketplace listings.
At its core, product photography for ecommerce serves as your customers’ eyes and hands in the digital world. Since shoppers can’t physically touch, try on, or examine your products, your imagery has to do all the heavy lifting. This means capturing not just how a product looks, but how it feels, functions, and the details about it that make a shopper decide your product is the one for them.
The discipline covers various styles and techniques, from clean white background shots that meet marketplace requirements to lifestyle photography that tells your brand story. Modern ecommerce photography also includes specialised techniques like 360-degree spins, focus stacking for intricate details, and packshot photography that showcases products alongside their packaging.
What sets professional product photography apart from casual snapshots is the attention to technical excellence and brand storytelling. Make sure you use consistent lighting, accurate colours, sharp details, and compositions that guide the viewer’s eye to key product features. How? We'll get on to that shortly.
Why quality product photography matters for online sales
The numbers don’t lie: 90% of consumers consider visual appearance the key deciding factor in purchases.
That’s because customers shopping online need to trust the quality of the product without ever seeing it in person.
Your imagery bridges this gap. When product photos are sharp, well-lit, and accurately represent the item, customers feel more secure about their purchase.
The advantage of excellent photography extends beyond your Shopify site, too. On crowded marketplaces like Amazon and eBay, your thumbnail image is often the first (and sometimes only) chance to capture attention.
Not only that, quality photography boosts your brand perception. Customers associate image quality with product quality, meaning they’ll be more accepting of a higher price tag. That’s what expert photographer Emma Dunham managed to do for ecommerce baking brand Delightfully Decadent. Her product shots meant they could increase the price tag of their baked goods by 66%.
(💡 Find out more in Emma’s food photography tips article.)
All that’s to say: investing in great product photos often pays for itself through higher average order values (AOV) and improved customer lifetime value (CLV).
Essential types of ecommerce product photography
Product photography
Consider product photography one of the key foundations of your ecommerce store. These shots feature your products against a clean backdrop, eliminating distractions and allowing the item to speak for itself. They should create consistency across your product catalog, making it easier for customers to compare items. They’re also incredibly versatile—perfect for everything from main product images to catalog listings, and provide a clean foundation for promotional graphics and social media posts.
In the words of Toby Lamborn, who takes product shots for paint brand COAT:
“It's really important to set solid expectations for your customers. That means you need to understand the most important elements of your product.”
💡 Read Toby’s tips on how to take great product photos.
Misfits, who make protein bars, are a good example of product photography done right. Check this shot out of their Cookie Butter bar, with it’s bold backdrop and its intentful product composition.

Product shots with clear backgrounds are easier to adapt for major ecommerce marketplaces like Amazon: you’ll just need to replace coloured backgrounds with white to fit their requirements.
Lifestyle photography
Whilst white background shots showcase your product, lifestyle photography sells the dream. These images show your products in real-world contexts, helping customers visualise how items fit into their daily routines and aspirations.
A skincare brand might show their products in a serene bathroom setting with soft morning light, for instance. Or check this real-life example out from Illegal Mezcal. They’re showing you how they’re drink is meant to be enjoyed: on the beach, with friends, and listening to music.

The power of lifestyle imagery lies in emotional connection. When customers see themselves reflected in your photography, they’re more likely to purchase. This style is particularly effective for fashion, home décor, and lifestyle products where context matters as much as the product itself.
However, lifestyle photography requires more planning and resources than studio shots. You’ll need to consider locations, props, models (when appropriate), and styling elements that authentically represent your brand whilst remaining accessible to your target market.
Detail and close-up shots
In the absence of physical interaction, detail shots serve as your customers’ magnifying glass. These close-up images highlight textures, materials, craftsmanship, and features that distinguish your products from competitors.
Detail photography is particularly crucial if you're selling products that have high price tags, like luxury goods, electronics, and jewellery. Use detail shots to really highlight the quality and craftsmanship of your products. A close-up of leather grain, fabric weave, or electronic components provides the kind of information customers need to justify their purchase decision.
Take this example from bag company Stubble & Co. In this detail shot, they’re showing both the quality of the backpack and also one of its key selling points: that it’s fully waterproof.

However, the technical demands of detailed photography can be significant. You’ll need macro capabilities, careful lighting to avoid harsh shadows, and often focus stacking techniques to ensure every element remains sharp. The goal is revealing more detail than customers could see with the naked eye in a physical store.
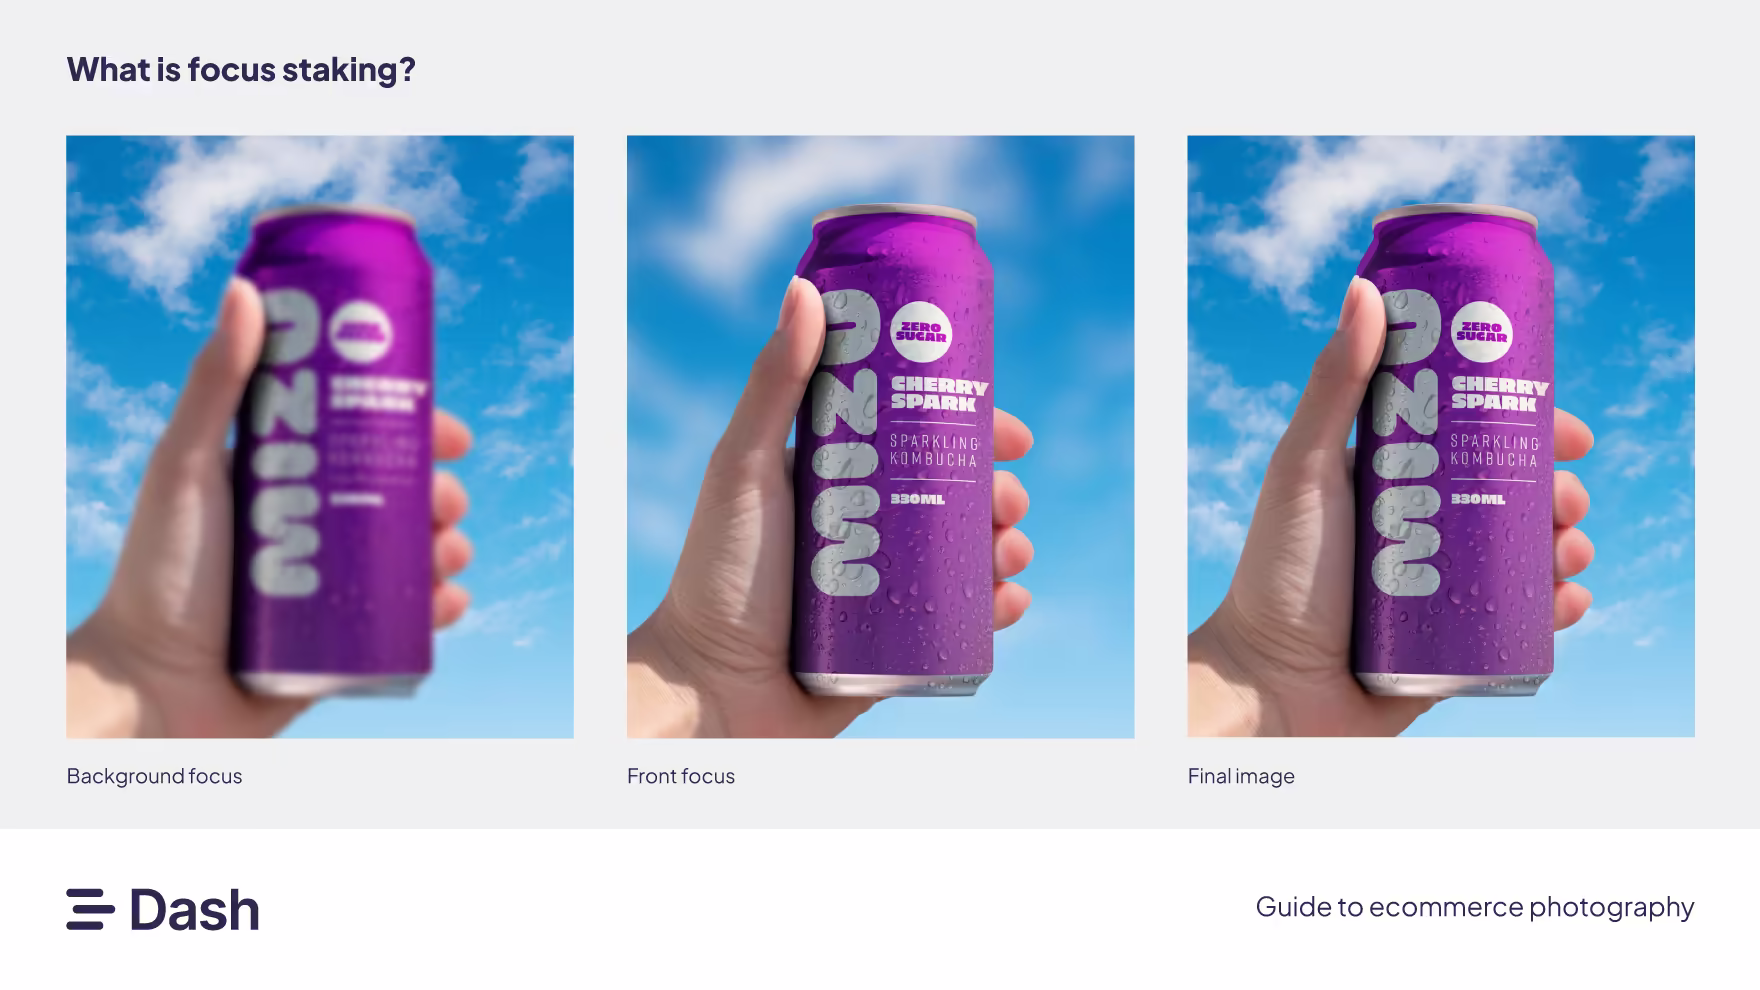
[fs-toc-omit] What's focus stacking?
This technique is essential to master if you're serious about detail shots. It's basically a processing technique where you combine multiple photographs. Each of these shots are focused on a different focal plan, or depth. When you combine them, you create a single image with a greater depth of field. This means that the entire image is sharp, from the foreground to background, meaning no essential detail is missed by potential customers.
Group and bundle photography
Group shots serve multiple purposes in your ecommerce photography arsenal. They showcase product variants and create opportunities for cross-selling complementary products.
When photographing product collections or bundles, consider your composition. The arrangement should feel natural whilst ensuring each item remains clearly visible and identifiable. This style works particularly well for fashion brands (where you can showcase an entire outfit on your online store), skincare sets, tech bundles, or any situation where you’re selling multiple related items.
Group shots also help customers understand product sizing and relationships. Showing a phone case next to the actual phone, or displaying all available colours of a product side-by-side, provides important context that individual shots just can't convey.
Check out this subtle example from bedding brand Sheet Society. They’ve used one photo to show how you can style multiple items together.

Packaging and unboxing shots
Don’t underestimate the power of packaging photography. These images set expectations for the entire customer experience, from delivery to unboxing. In an era where unboxing videos dominate social media, packaging presentation has become part of the product itself.
Product packaging images serve practical purposes too. They show shoppers exactly what they’ll receive. For instance, Bloom & Wild make ordering flowers easy as their packaging is designed to fit through standard letterboxes. It therefore makes complete sense they show that in their product photography.
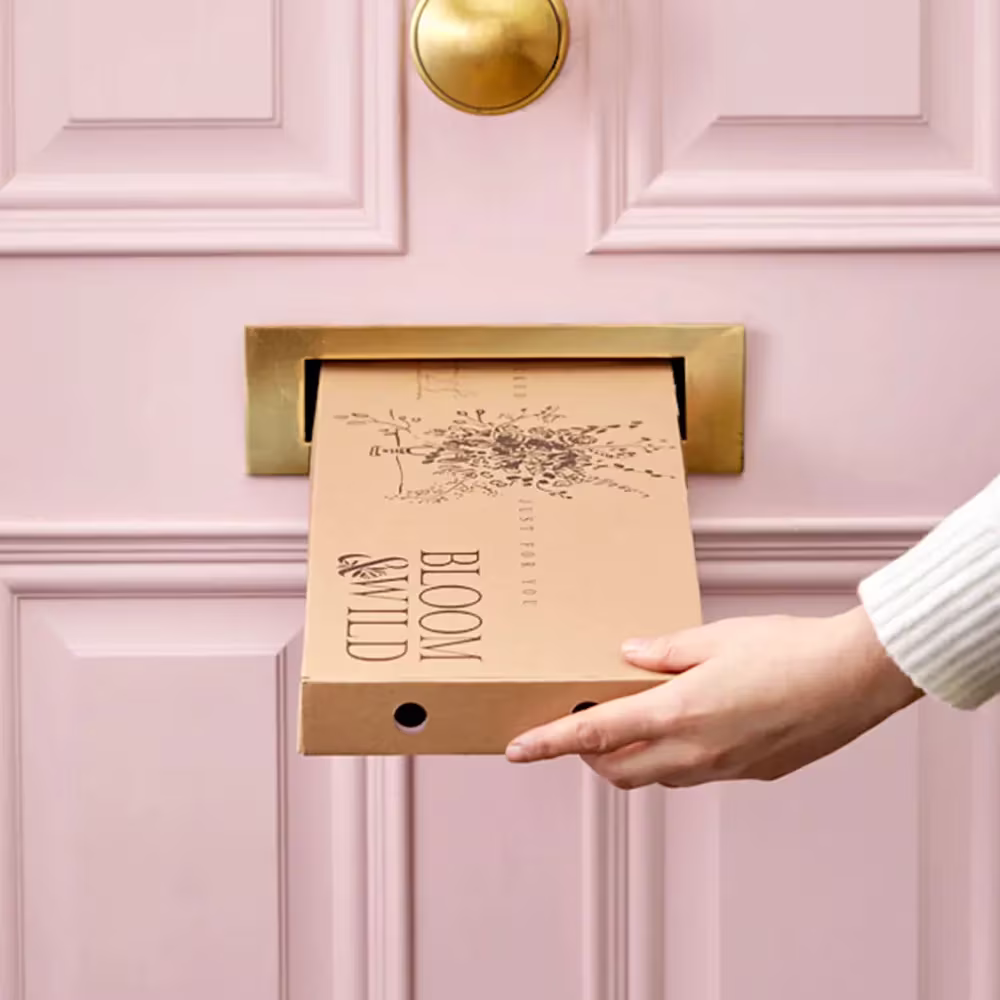
So don’t overlook packaging shots. We'd recommend capturing both the unopened package and what the product looks like during unboxing, too. Like Bloom & Wild, this works well for subscription boxes or products where presentation is part of the value proposition.
Pick the right camera for your product photography
Deciding what camera you want to use is a great place to begin when you're starting your DIY product photography journey. Here's a breakdown of the different types of cameras you should consider:
[fs-toc-omit] Digital Single-Lens Reflex (DSLR) cameras
These are traditional cameras and the ones you've most likely heard of before. They have interchangeable lenses, meaning you're able to use them for a variety of images. However, with this comes more complexity so it's worth reading up on how to use them properly.
Why they're good:
- Great image quality
- Can still perform well in low light levels
- You get full creative control over aperture, shutter speed and other important variables.
Limitations:
- They're difficult to learn if you're just starting out
- They can be bulky and heavy to carry
Best for: Brands who are investing in a long-term content and ecommerce photography strategy, especially if hiring an in-house photographer.
Price range: From $400 to $4,000+
[fs-toc-omit] Point-and-shoot (compact) cameras
These are smaller and lightweight than DSLRs. They come with fixed lenses, so don't have the steep learning curve. But that also means they're not as adaptable as their more expensive DSLR cousins.
Why they're good:
- Portable and easy to use
- They often have better optical zoom than most smartphones
Limitations:
- More limited manual control
- Imagery is not as high quality as DSLRs.
Best for: Brands on more of a budget who aren't yet ready to invest in more expensive models.
Price range: $100-$800.
[fs-toc-omit] Your smartphone
Maybe you're already carrying your would-be camera around in your pocket. Modern smartphones, particularly iPhones and Samsung Galaxy models, can produce surprisingly professional results.
Why they're good:
- Cost effective. Just use the smartphone you most likely already have!
- Easy to use with much more intuitive controls
- Big name smartphones have clever features like night mode that enhance the quality of your creative
Limitations:
- Often not great for close-up shots
- Shallow depth of field can mean more editing
- You don't have much control over aperture etc.
Best for: Brands who want to get going without lots of extra cost.
Price range: Free, if you already have a smartphone!
Bonus tips: How to get great product photography using just your smartphone
If you opt for smartphones for your product photography, here's how to make the most of them. You might not need that fancy DSLR camera after all!
1. Use the rear camera, not the selfie camera
Rear cameras have better lenses and higher resolution. If your phone has multiple lenses, use the main wide lens for most shots. It produces cleaner, sharper images.
2. Lock focus and exposure
On iPhone, tap and hold on your product until you see AE/AF Lock. On Android, long-press to lock focus. This prevents the camera from 'hunting' for focus mid-shot. Then, slide your finger up or down to fine-tune brightness.
3. Avoid digital zoom
Digital zoom degrades quality. Instead, physically move closer to the product or crop later in editing. If you have to zoom, stick to 2x optical zoom on phones with telephoto lenses.
4. Shoot in portrait mode for depth
For lifestyle shots, portrait mode can create a cool background blur. You should just make sure the phone detects the product’s edges to avoid blurry corners.
5. Switch on gridlines
Turn on your camera’s grid to align products perfectly and avoid tilted shots. Get the product centre or use the rule-of-thirds lines for balance.
6. Shoot in RAW when possible
Many phones now allow RAW shooting (e.g., iPhone’s ProRAW). RAW files capture more detail, giving you flexibility to fix lighting and colour in editing apps like Lightroom Mobile.
7. Use burst mode for action shots
If you’re pouring coffee, spritzing your perfume, or showing movement, hold down the shutter button to capture a burst, then select the sharpest frame.
Setting up your DIY product photography studio
[fs-toc-omit] Studio equipment
Your equipment foundation should include a sturdy tripod. Trust us: this single investment will improve your photography more than any other upgrade. Camera shake is the enemy of sharp product photos, and even the slightest movement can ruin an otherwise perfect shot.
[fs-toc-omit] Lighting and light sources
Good lighting can make your photoshoot. Natural light streaming through a large window often produces better results than expensive studio equipment. North-facing windows provide the most consistent light throughout the day, whilst overcast conditions create beautifully diffused light that’s perfect for product photography.
When natural light isn’t working for you, or you're burning the midnight oil, affordable LED panels or even desk lamps with daylight bulbs can supplement your setup. The key is achieving even, shadow-free lighting that accurately depict your product colours.
Don’t forget basic light modifiers—white foam core boards or even large sheets of white paper can act as reflectors to fill shadows and create more even lighting across your products.
[fs-toc-omit] Shooting surface
The surface you take the product shot on should be stable and at a comfortable working height. A dining table or desk works perfectly, allowing you to position your camera at a good angle without straining your back during longer shooting sessions.
[fs-toc-omit] Backdrop
Your backdrop doesn't need to be elaborate. A roll of white kraft paper, poster board, or professional seamless paper creates a clean background that helps your product pop. The investment is minimal but it’ll help elevate your shots - trust us!
The 5 photography steps to follow
Okay, you've set up your studio. Now it's time to get photographing! Here's a step-by-step process you can follow to make sure your shoots go off without a hitch.
[fs-toc-omit] Step 1: Pre-shoot preparation
Success in product photography starts long before you pick up your camera.
- Product inspection: Before you start shooting, clean and inspect each product thoroughly. Dust, fingerprints, and scratches that are invisible to the naked eye become glaringly obvious in photographs, especially if you're taking close-up shots.
- Shot list: Plan your shot list in advance, including the angles and styles you need for each product. This preparation prevents forgotten shots and ensures consistency across your entire product catalog.
- Shooting sequence: With your list decided, you can plan your shooting sequence strategically. Group similar products together to minimise setup changes, and shoot all angles of each product before moving to the next item. This approach means you'll stay consistent and efficient.
- Camera settings: Test the settings on your camera with a sample product before diving into your full catalog. This trial run helps you identify optimal settings and spot any issues with your lighting setup before you’ve invested significant time in the process.
[fs-toc-omit] Step 2: Get your lighting set up
Understanding light is the difference between amateur snapshots and professional-looking product photography. Natural light remains the source that's easiest to work with for beginners.
The best natural light occurs during overcast conditions, which create a giant natural diffuser that gets rid of harsh shadows. If you’re shooting during sunny weather, position your setup away from direct sunlight to avoid stark contrast, intense shadows and colour casts.
For artificial lighting, don't mix different light sources with varying colour temperatures. Household tungsten bulbs, fluorescent lights, and daylight all have different hues that will make colour correction during editing an absolute nightmare.
When using multiple light sources, position your key light at a 45-degree angle to your product for the most natural-looking illumination. Add a fill light or reflector on the opposite side to soften shadows and create more even lighting across the entire product.
Pay extra attention to reflective surfaces, which pick up unwanted reflections - you might accidentally end up taking a selfie! Large diffusion materials like white sheets or shower curtains help create broad, even light sources that can banish tricksy reflections.
[fs-toc-omit] Step 3: Taking the shot
You’re ready to start snapping! Here’s everything you need to know to take those perfect shots.
- Camera stability: When capturing product shots, camera stability is super important. Use a tripod for every shot, even if you think you can hold the camera steady. This consistency allows you to maintain identical framing when shooting multiple angles of the same product.
- Aperture: Choose a small aperture (f/8 to f/11) to ensure your entire product remains in sharp focus. While a shallow depth of field might look fancy, your online shoppers will need to see every detail clearly. Save creative techniques for social media, lifestyle shots and marketing materials.
- RAW format: Shoot in RAW format whenever possible. RAW files contain a lot more image data than JPEGs, making post production for colour correction, exposure adjustments, and detail enhancement much easier.
- Angles: Capture multiple angles systematically: front, back, both sides, top, and bottom where relevant. Don’t forget detail shots of important features, textures, or unique selling points. We'd recommend taking 5-10 shots of each angle, so you can then pick the perfect shots when you edit.
- Consistent settings: Keep consistent camera settings throughout your shoot. Once you’ve settled on the best exposure, white balance, and focus settings for your lighting conditions, stick with them. This consistency simplifies post production and ensures uniform quality across your entire catalog.
[fs-toc-omit] Step 4: Post-production and photo editing
Your shoot is done! Now it's time to edit. Post production is where good product photos become great ones. Pick Adobe Lightroom or Photoshop for images shot on a camera. Or, if you're shooting on a smartphone, you might want to go with mobile editing apps like Snapseed or VSCO.
- Basic adjustments: Once you're in your chosen editing application, start with basic adjustments: exposure, highlights, shadows, and contrast. The goal is to create images that accurately represent your products whilst looking great and remaining consistent across your catalog. Don't over-edit to the point where your products look unrealistic.
- Colour correction: Colour correction is crucial. Your product colours should match reality as closely as possible. Use the white balance tool to neutralise any colour casts, then fine-tune individual colour channels if necessary. This accuracy is particularly important for fashion, cosmetics, and home decor where colours drives purchase decisions.
- Tidy-up: Background cleanup and removal often require the most time in post production. For white background images, use tools like the Magic Wand or Quick Selection tools in Adobe to isolate your product, then replace the background with pure white. This ensures marketplace compliance and creates the clean, professional look customers expect.
[fs-toc-omit] Step 5: Storing your photography
Your photography is ready to be used by you and your team! Now you're faced with a choice. You can either dump all that creative you spent blood, sweat and tears on in Dropbox where they're hard to find and will most likely gather dust. Or you can pick a tool like Dash. Why?
Dropbox is great for file storage. But when you’re using it to manage thousands of product creative, like so many ecommerce brands do, you’ll start to feel it slowing you down. It’s hard to search for the creative you need and difficult to share it with your team and partners.
That’s why you should consider a tool like Dash to keep your product photography in. Use it to keep your photos organised in one place where they're easy to find, organise and share. Approve your imagery, then tag them with keywords and fields that'll be helpful for your team in surfacing these shots: think SKU code, photographer, campaign name or product title.
Rather than share links to a maze of Dropbox folders, you use Dash portals to share product tassets with external partners like your retail network. All they need to do is access their portal, type in what they're searching for, and download the image they need - all without hassling you.
And your social media, marketing and ecommerce teams can login to Dash, send these shots straight to Shopify listings, or crop and resize them for their campaigns.
How to optimise your product creative for different marketing channels
Once you’ve captured high-quality product images and videos and stored them in Dash, you'll now want to optimise them for your ecommerce marketing channels. This will also help you get the most value out of every shot you've created. But remember, a single photo won’t work everywhere: every platform has its own technical requirements, aspect ratios, and audience behaviours.
[fs-toc-omit] Website and ecommerce platforms
Your Shopify website is where potential customers come to browse, compare, and buy. Clarity and accuracy matter most here.
- Hero images: Large, high-resolution shots for category pages and homepages. Recommended size should be at least 2,000 px wide, optimised for retina displays. And make sure they have a clean background so products stand out!
- Product detail pages (PDPs): Include shots that cover multiple angles. Don't forget context and close-up shots, too - these build customer trust and show the pro
Pro tip: Keep a consistent style guide for cropping, margins, and lighting so your entire site feels cohesive.
[fs-toc-omit] Paid advertising (Meta, TikTok, Google)
Paid ads should grab attention instantly, often in under three seconds.
- Meta (Facebook and Instagram Ads): Use square (1:1) and vertical (4:5) formats as these often perform best. Lifestyle imagery beats plain product shots in top-of-funnel ads, and be sure to add subtle motion, like cinemagraphs or stop-motion loops for engagement.
- TikTok and Reels: Vertical video only (9:16) which should focus on storytelling. Keep videos 15–30 seconds for higher completion rates.
- Google Shopping: Here, white or neutral backgrounds are mandatory. Ensure images meet Google Merchant Center requirements (minimum 1,000 px, no logos, no text overlays).
Pro Tip: Run tests with slightly different visuals to see which drives higher click-through rates. Use this data to inform your next shoot!
[fs-toc-omit] Organic social media
Your organic social platforms should reflect your brand personality. Don't go super hard on the sell!
- Instagram: Prioritize vertical imagery and reels. Use carousel posts to tell a story (e.g., product features or styling ideas).
- Pinterest: Tall images (2:3 ratio) perform best. Overlay light branding or text to make pins more clickable.
(💡 Here’s everything you need to know about resizing images for social media.)
Pro tip: Keep logos subtle. Remember you're popping up in people's personal feeds, and they don't often appreciate being sold too so directly. Instead, pick product photography that tells the story of your brand.
[fs-toc-omit] Email marketing
Product images in emails need to load fast and look great across devices. You don't want to crash anyone's inbox as their email client desperately tries to render that huge product photograph you include. Aim to keep file sizes under 200KB for fast loading, use horizontal banners for hero sections, square or vertical for product features.
Pro Tip: Test emails on multiple devices (desktop, iPhone, Android) before sending — what looks great on a laptop may appear cramped on mobile
Professional photography vs DIY: When to consider hiring professionals
Let's say you've got a few DIY shoots under your belt now, and your brand is growing. Now you might be asking: is it time to start using professional product photography services?
There's no one-size-fits-all when answering this question. It's going to depend on a few factors unique to your brand.
For example, consider briefing professional photographers for high-value products where image quality really impacts how it's perceived. Luxury goods often benefit from professional expertise in lighting, styling, and post production that’s going to be difficult to achieve in DIY setups.
Another scenario where you might want to opt for a professional photographer is when you're dealing with large product catalogs. Experienced ecommerce photography teams can shoot dozens of products efficiently, often completing in one day what might take you weeks (no offence).
Time constraints matter too. If you’re launching a new product line or preparing for a major sales event, professional ecommerce product photography services offer fast turnaround times that keep your business moving forward.
If you do decide to use a professional photographer, consider how you want to approve the creative they send your way. Rather than be inundated with WeTransfer links where you have to trawl through thousands of assets manually, use a tool like Dash.
With Dash, you can set your photographer up as a contributor. Once they've finished their shoot, they can then upload all their photographs to you ready for your approval. You can go through each one, reject the ones that don't work for you, leave feedback on the assets that need tweaking, and approve the ones you like. It saves time and your computer hard drive will thank you for it, too!
How to measure the success of your product photography
Now you've created all those product shots and got them out onto your marketing channels, your job is only half done. To make sure these are driving results, you'll need to measure performance and use data to refine your next photoshoot. This turns image creation from a cost center into a revenue engine.
Before you launch a campaign or upload new product photos, set clear goals. You'll want to pull metrics from different channels. When combined, they can paint an interesting story as to whether your product photography has had a positive impact on your ecommerce brand. Here's some suggestions:
- Website product page conversion rate (CVR): To help track if better images lead to more purchases
- Paid ad click-through rate (CTR): Are people engaging with your new creative more so than usual?
- Social media engagement rate: Are your new product images resonating with your followers?
- Return rate: If you're getting more orders, but more returns, this could point to your product images being misleading and inaccurate.
- Retail partner feedback: Are your retail partners actually using your new product creative? If they're in Dash, you can see which assets are being downloaded most.
Avoid this common ecommerce photography mistake
Now we'll leave you with this one pitfall we often see ecommerce brands make (before coming to us). Don't spend all that time and effort creating beautiful product images to just dump them in Google Drive and Dropbox. These are great tools for document collaboration, but they're not made for your brand's images. Instead, follow the lead of world-class ecommerce businesses like Passenger, RIXO and Beavertown, and use Dash. With Dash you can:
- Build a home for your creative that actually does them justice, with easy to use and elegant UX
- Tag your imagery with custom fields, creating a search engine for your brand's visual content.
- Find the product image you need super fast using Dash's clever AI search
- Get assets ready for campaigns fast without having to bother your designer
- Make it easy for external partners, like your retail network or your ad agency, to find the product images they need
And much more. Interested? Try Dash out for yourself with a free, no-strings trial.

Barney is the Marketing Lead for Dash. He writes about small business marketing strategies and how DTC brands can boost sales.